Dealing with a 500 Internal Server Error on your WordPress website? Let Trends WordPress handle it for you! Our affordable Emergency WordPress Support is available to fix your site fast, troubleshoot the cause of the error, and ensure your website is back up and running smoothly. Don’t let technical issues disrupt your site—hire our team of expert professionals to resolve your 500 errors and prevent future problems. Get peace of mind with Trends WordPress today and let us take care of everything!
The internal server error is one of the most common WordPress errors.
The 500 Internal Server Error can be challenging to troubleshoot since it doesn’t provide any specific details, making it frustrating for many beginners.
In this guide, we’ll walk you through simple steps to quickly fix the 500 Internal Server Error in WordPress.
Here is a quick overview of the topics we will cover in this article:
- What Is the 500 Internal Server Error?
- What Causes the Internal Server Error in WordPress?
- Fixing the 500 Internal Server Error in WordPress:
- Clear WordPress and Browser Cache
- Check for a Corrupt .htaccess File
- Increase the PHP Memory Limit
- Deactivate All WordPress Plugins
- Switch to a Default WordPress Theme
- Re-Upload Core Files
- Enable Debug Logs in WordPress
- Contact Your Hosting Provider
What Is the 500 Internal Server Error?
The “500 Internal Server Error” means that the server encountered an unexpected condition, preventing it from fulfilling the request. Unfortunately, this is a generic error message, which means the server couldn’t provide a more specific explanation.
The appearance of the error page can vary depending on the web server software (Nginx or Apache) and the browser being used.
Here’s an example of how the error page might appear on Apache:
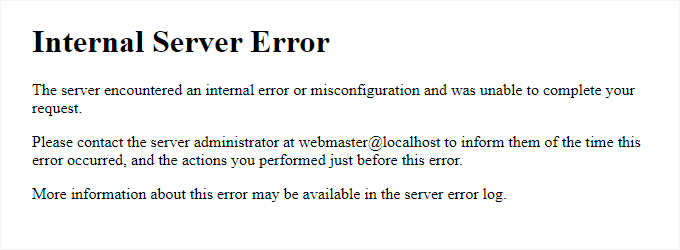
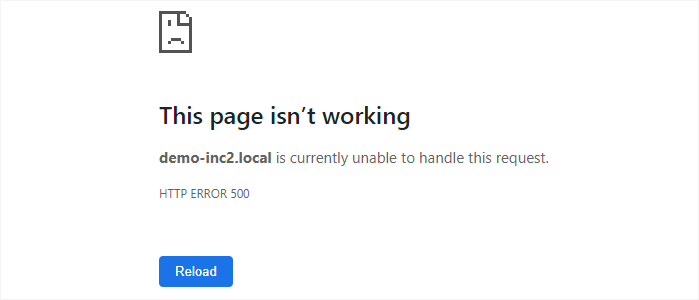
It may look different if you are using Nginx and Google Chrome.
It will also look different if Google Chrome is unable to find an error page to display:
For beginners, the 500 internal server error can be especially frustrating since it doesn’t provide any clear guidance or clues to resolve the issue.
It’s like telling your doctor you’re in pain but not knowing where the pain is coming from. Without more information, it’s challenging to pinpoint the problem.
However, by understanding the common causes of this error, you can troubleshoot and fix the issue step by step without causing further damage to your site. Each potential cause can be addressed methodically, increasing your chances of resolving the error.
What Causes the Internal Server Error in WordPress?
Other potential culprits include exceeding your PHP memory limit or corrupt core WordPress files. In some cases, you may encounter the internal server error only when trying to access the WordPress admin area, while the rest of the site may function normally.
This error typically arises before WordPress can fully load, leaving the server with insufficient information to determine the cause of the problem.
To gain a deeper understanding of the underlying mechanics of WordPress, check out our article on how WordPress works behind the scenes.
Now, let’s explore the troubleshooting steps you can take to resolve the internal server error in WordPress.
Fixing the 500 Internal Server Error in WordPress
Before diving into troubleshooting the internal server error, it’s crucial to have a complete backup of your WordPress website.
If you can access the WordPress admin area, a backup plugin like Duplicator is highly recommended. It allows you to quickly back up your site, store backups in the cloud, and restore your site from those backups whenever necessary.
If you don’t have access to the WordPress admin area, you can manually back up your website using phpMyAdmin and an FTP client.
Once you have your backup secured, you can proceed with the following steps to troubleshoot and resolve the internal server error on your website.
Clear WordPress and Browser Cache
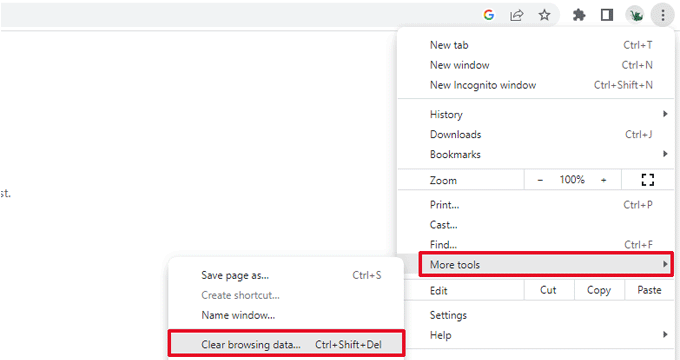
To resolve this, start by clearing your browser cache. Here’s how you can do it:
Google Chrome:
- Click the three dots in the top right corner.
- Go to More Tools > Clear Browsing Data.
- Select the time range (e.g., All Time) and check Cached images and files.
- Click Clear data.
Firefox:
- Click the three horizontal lines in the top right corner.
- Select Options > Privacy & Security.
- Scroll down to the Cookies and Site Data section and click Clear Data.
- Check Cached Web Content and click Clear.
Safari:
- Go to Safari > Preferences.
- Click the Advanced tab and enable Show Develop menu in menu bar.
- From the menu bar, select Develop > Empty Caches.
After clearing your browser cache, refresh your website to check if the internal server error is resolved. If the issue persists, you may need to investigate further by following additional troubleshooting steps.
Checking for Corrupt .htaccess File
.htaccess file is a crucial server configuration file used by WordPress to manage redirects and other server settings. One of the most common causes of the internal server error is a corrupt .htaccess file.To fix this, you can follow these steps:
Update Permalinks:
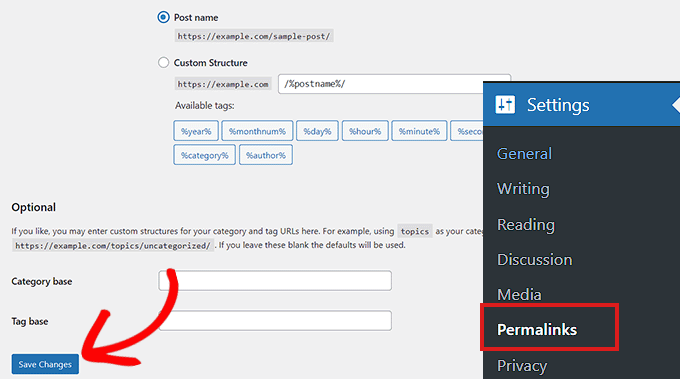
- Log in to your WordPress admin area.
- Go to Settings > Permalinks.
- Without making any changes, simply click the Save Changes button. This action prompts WordPress to update your
.htaccessfile or create a new one.
Check if the Issue Persists:
- Visit your website to see if the internal server error is resolved. If the error remains, proceed to check the file permissions.
Verify File Permissions:
- Sometimes, incorrect file and directory permissions can prevent WordPress from creating or writing to the
.htaccessfile. Ensure that the permissions for the.htaccessfile are set to644.
- Sometimes, incorrect file and directory permissions can prevent WordPress from creating or writing to the
Manually Replace the .htaccess File:
- Log in to your website using an FTP client or through the File Manager in your hosting account’s control panel.
- Locate the existing
.htaccessfile in the root directory of your WordPress installation, which is the same directory that contains folders likewp-content,wp-admin, andwp-includes. - Rename the existing
.htaccessfile to.htaccess_oldto keep it as a backup. This prevents WordPress from recognizing it while allowing you to revert if necessary.
Create a New .htaccess File:
- After renaming the old
.htaccess, create a new file named.htaccessin the same directory. You can do this directly in your FTP client or File Manager. - Add the default WordPress code to the new
.htaccessfile:
# BEGIN WordPress <IfModule mod_rewrite.c> RewriteEngine On RewriteBase / RewriteRule ^index\.php$ - [L] RewriteCond %{REQUEST_FILENAME} !-f RewriteCond %{REQUEST_FILENAME} !-d RewriteRule . /index.php [L] </IfModule> # END WordPress- After renaming the old
Save Changes and Check Your Site:
- After creating the new
.htaccessfile, save your changes and refresh your website to see if the internal server error has been resolved.
- After creating the new
By following these steps, you should be able to address any issues related to a corrupt .htaccess file and hopefully resolve the internal server error on your WordPress site.
Increasing the PHP Memory Limit
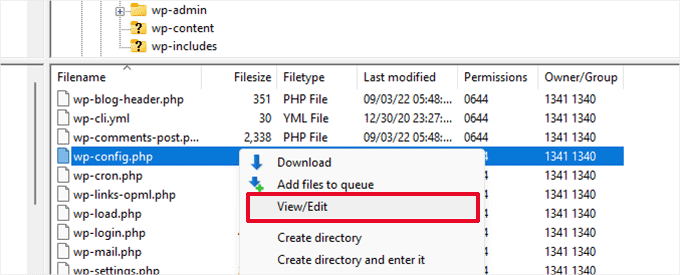
wp-config.php file. However, if you’re a beginner, it’s crucial to follow these instructions carefully, as even minor errors in WordPress core files can lead to significant issues.Here’s How to Increase the PHP Memory Limit:
Connect to Your Website:
- Use an FTP client or the File Manager tool in your hosting account control panel to connect to your WordPress website.
Locate the wp-config.php File:
- In the main folder of your website, find the
wp-config.phpfile.
- In the main folder of your website, find the
Backup the wp-config.php File:
- Right-click on the
wp-config.phpfile and select Download to save a backup in case something goes wrong during the editing process.
- Right-click on the
- Once you have a backup, right-click on the file again and select View/Edit.
- In the
wp-config.phpfile, add the following line of code just above the line that reads, “That’s all, stop editing! Happy publishing”:Edit the wp-config.php File:
define( 'WP_MEMORY_LIMIT', '256M' );Save Changes:
- After adding the line, save the changes and close the file.
Check the Site:
- Visit your website to see if the internal server error is resolved.
Note:
- If setting the memory limit to
256Mdoes not resolve the issue, try increasing it to512M.
If You Encounter the Error When Logging into Admin or Uploading Images:
If the internal server error only appears when you log in to the WordPress admin area or try to upload images, consider using the following method to increase the memory limit:
Create a php.ini File:
- Create a new blank text file on your computer and name it
php.ini.
- Create a new blank text file on your computer and name it
- Open the
php.inifile and paste the following code:Add Memory Limit Code:
memory=256MB- Open the
Upload the File:
- Use your FTP client to upload the
php.inifile into the/wp-admin/folder.
- Use your FTP client to upload the
Temporary Fix:
While increasing the PHP memory limit may temporarily resolve the internal server error, it’s essential to identify the underlying cause. This issue may stem from a poorly coded plugin or a theme function.
Recommendation: Contact your WordPress web hosting provider to review the server logs. They can help diagnose the issue and identify any scripts or plugins that may be consuming excessive memory.
If the Error Persists:
If increasing the PHP memory limit doesn’t fix the problem, further troubleshooting will be necessary to identify the root cause of the internal server error.
Enable Debug Logs in WordPress
Using the WP Debugging Plugin:
- Install the Plugin: You can easily enable debugging by using the WP Debugging plugin. For guidance on installing a WordPress plugin, refer to our comprehensive guide.
- Activate the Plugin: Once activated, the plugin will automatically turn on debugging logs for your WordPress website.
If You Can’t Access the Admin Area: If you don’t have access to the WordPress admin dashboard, you can enable debugging by editing the wp-config.php file manually. Follow these steps:
Connect via FTP: Use an FTP client to connect to your website.
Edit wp-config.php: Locate the
wp-config.phpfile in your main website folder.Add Debugging Code: Add the following lines of code before the line that says, “That’s all, stop editing! Happy publishing”:
define( 'WP_DEBUG', true );
define( 'WP_DEBUG_LOG', true );
Save Changes: After adding the code, save the changes to the
wp-config.phpfile.
Viewing Debug Logs
Once you have enabled debug logs, you can view these logs by navigating to the /wp-content/ folder using your FTP client.
- Locate the Debug Log: Find the file named
debug.login the/wp-content/folder. - Open the Log File: Download or open this file in a text editor to view the logged errors and warnings.
Analyzing the Logs
The debug log will list any errors and warnings that occur on your website. While some of these issues may be minor and harmless, others could provide crucial insights into what might be causing the internal server error.
- Helpful Insights: Look for entries in the log that correlate with the time you encountered the internal server error. They may help you pinpoint the specific plugin, theme function, or script causing the issue.
By following these steps, you can utilize WordPress’s debugging features to troubleshoot and resolve the internal server error effectively. If you’re still having trouble, consider reaching out to your hosting provider for additional assistance.

